Part 3: Solving the Final Layer
- At this point, you should have 2 layers of the cube completely solved.
- If you only have one layer solved, move back to part 2
- If you don’t have any layers solved, move back to part 1
- Otherwise, you're good to go! Move on to section 3-1
Section 3-1: Make a plus sign of the final face's color
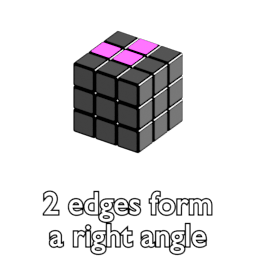
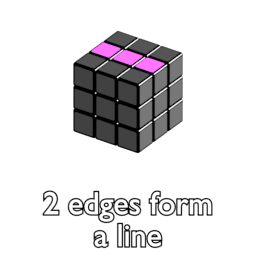
- Look at the top layer of the cube, specifically any stickers on edge pieces on the top face that match the color at the center of this face. There will either be...
- No matching edge stickers next to the center piece (go to step 3-1a)
- 2 edge piece stickers that meet at the center piece to form a right angle (go to step 3-1b)
- Or 2 edge piece stickers forming a straight line through the center piece (go to step 3-1c)
Step 3-1a:
- Perform algorithm 5 once (orientation of the cube doesn't matter as long as the only unsolved layer is on top)
- Move on to step 3-1b
Step 3-1b:
- Perform algorithm 5 once (orientation of the cube doesn't matter as long as the only unsolved layer is on top)
- Move on to step 3-1c
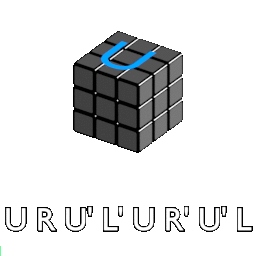
Step 3-1c:
- Perform algorithm 5 once (orientation of the cube doesn't matter as long as the only unsolved layer is on top)
- Move on to section 3-2
Section 3-2: Put the edge pieces of the top plus sign into their correct positions
- Rotate the top layer of the cube until at least one of the edge pieces forming the plus sign you made is aligned with both the centers that match the 2 colors on that edge piece
- Hold the cube with this edge piece in front and the plus sign at the top
- Using the instructions below, use algorithm 6 to align the rest of the edge pieces with their respective centers in the middle layer of the cube:
- algorithm 6 swaps all the edge pieces of the top plus sign except the one facing you so that these 3 pieces each move one spot counter-clockwise (as if you were looking straight down at the top of the cube)
- Don’t be afraid to keep rotating the top face and then trying this algorithm repeatedly until all 4 edges line up
- It may take some time to understand how to manipulate these pieces, but eventually you’ll get a more intuitive feel for how to align these pieces quickly
- HINT: If 2 of the top edge pieces are solved when you start the algorithm, you’ll get nowhere. Since this algorithm moves 3 of the 4 pieces, make sure only one is lined up when you start the algorithm so that the other 3 can fall into place
- Once all 4 edge pieces forming the top plus sign are in their correct positions, move on to section 3-3
Section 3-3: Put the top corners into the correct location
- Algorithm 7 (don't perform it until specified) is the only one required for this section. This algorithm swaps the 3 corners in the front left, back left, and back right positions with each other without ruining any of your previous work
- Look at the top corners. See if any of them are in the correct location (not necessarily the correct rotation). Either:
- None of the corners are in the correct spot (go to step 3-3a)
- Only 1 corner is in the correct location (go to step 3-3b)
- All of the corners are in the correct location already (go to section 3-4)
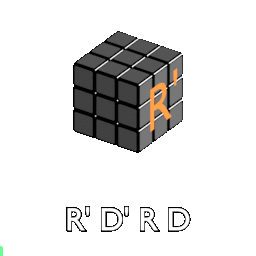
Step 3-3a:
- Hold the cube so that the final unfinished face is at the top
- Perform algorithm 7 once. One of the corners should now be in the correct location (again, not necessarily the correct rotation)
- Move on to step 3-3b
Step 3-3b:
- Find the single top corner that is in the correct location (again, not necessarily in the correct rotation)
- Hold the cube so that the unfinished face is at the top and that the corner piece you found is in the top, right, front position
- Perform algorithm 7 repeatedly until all of the other 3 corners are also in their correct locations
- Move on to section 3-4
Section 3-4: Correct the rotation of the top corners (final section!)
- At this point, either 0, 2, or all 4 corners will not only be in the correct location, but also the correct rotation
- If all 4 are, congrats! You’re lucky enough to skip a step and you’ve just solved a Rubik’s Cube
- Otherwise, move on to step 3-4a, you’re almost done!
Step 3-4a:
- We will be using algorithm 2 from earlier this guide to solve all the remaining corners. It will look like the cube is being ruined and scrambled all over again for a moment, but if you read and follow these final steps carefully, it will all come back together in the final few turns as if by magic
- Find any corner that is not yet in the correct rotation and hold the cube so that the final layer is at the top, and this corner is at the top, front, right position (see figure 9)
- Move on to step 3-4b
Step 3-4b:
- Perform algorithm 2 repeatedly until the corner you're working on is rotated the correct way (use only the top face color to check this. The rest of the cube is going to look messy for a few moments)
- Keep holding the cube as you are, and locate another corner that is not in the correct rotation
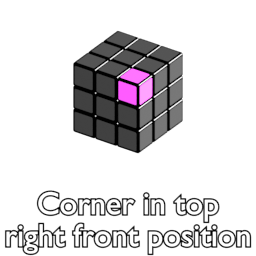
- Turn the top face so that this corner is at the top, right, front position (see figure 9) and again, perform algorithm 2 until this piece is in the correct rotation
- Repeat this process of rotating only the top face to place any remaining unsolved corners in the top, right, front position and performing algorithm 2 until all the corners are solved.
- You’ll know when you’re done with this step, and will only need to turn the top row to match the 2 below it and will have finally completed a Rubik's Cube! Congrats!